I recently built a DIY solar panel stand that cost me just $11.

That’s an insane deal. Store-bought solar panel stands and mounts regularly cost five times as much.
What’s more, this homemade stand is adjustable, portable, and easy to build.
Here’s how to make it.
Materials & Tools
Materials

Note: I’ve listed the sizes I used for my specific panel, a 100 watt HQST solar panel. Follow Step 2 and Step 3 to find the right sizes for your panel.
- 1/2″ PVC for crossbar
- 3/4″ PVC for legs, base, and support beam
- 4 3/4″ PVC tee joints
- 2 3/4″ PVC elbow joints
- 2 3/4″ self-drilling screws
- 2 tent stakes or paracord
Tools

- Tape measure
- Saw
- Drill
- Marker
Step 1: Understand the Stand Design
Here’s the design for the stand we’ll be building:

It’s made of seven sections of PVC pipe:
- Crossbar
- Support beam
- Base beam
- 2 upper leg sections
- 2 lower leg sections
The sections are all connected together with PVC tee and elbow joints. The crossbar is then attached to the panel with self-drilling screws.
Note that the crossbar is a thinner pipe than all the others. This allows the tee joints to slide back and forth across it freely.
The dimensions for all the sections of PVC need to be customized for your specific panel. (Don’t worry, I’ll show you how to find all the measurements.)
Now let’s get building!
Step 2: Measure the Gap of Your Solar Panel’s Frame
Flip your solar panel over. Measure the gap between the frame’s rim and the back of the panel.

Use this number to determine the thickness of the PVC pipes and length of the self-drilling screws you use.
My panel’s gap is just under 1″ tall, so I decided to use 1/2″ PVC for the crossbar and 3/4″ PVC for the legs, base, and joints. I also used 3/4″ self-drilling screws.
Tip: PVC sizes refer to the diameter of the pipe’s hole. The pipe itself is a bit thicker. For instance, my 1/2″ PVC pipe is about 13/16″ in diameter.
Step 3: Measure the Stand Dimensions
Time for lots of measuring!
We need to find the following dimensions:
- Crossbar length
- Stand width
- Stand height
Once we know these measurements, we can find the length of all the individual pieces of PVC.
Crossbar Length
Decide whether you want your solar panel to stand horizontally or vertically.

I decided to mount mine horizontally because my panel’s junction box and cables would get in the way of the stand if mounted vertically.
Find the crossbar length by measuring the distance between the inside of the frame from one side to the other.

Mine ended up being 35″. You’ll likely get a different number if you have a different panel or choose to mount yours vertically.

Record this number.
Stand Width
You get to decide this number yourself.
The main consideration here for me was to make sure the panel’s cables and junction box wouldn’t get in the way when I collapsed the legs.
(If you’re junction box isn’t in the way this won’t be a consideration for you.)
I ended up deciding to make my stand 21″ wide (indicated by the pencil). At that width, my panel’s junction box and cables won’t get in the way.

To show you what I mean, here’s a PVC pipe laid at the 21″ mark.

As you can see, the junction box isn’t in the way and the cables can easily be moved out of the way.
Decide how wide to make your stand. Record this number.
Tip: You can see the grid lines of the solar cells on the back of some panels. You can use these as guidelines when deciding how wide to make your stand. For instance, I chose to make mine three grid lines from the frame on each side.

Stand Height
You also get to choose how tall you want your stand to be.
I wanted my stand’s legs to sit flush against the panel back when collapsed. So I had to make sure the stand wouldn’t touch the bottom rim of the panel’s frame.
I arbitrarily decided to make my stand tall enough that there was about 1″ of space between it and the frame on both top and bottom.
I put the pipe I planned to use for the crossbar 1″ from the top of the frame.

I put the pipe I planned to use for the base beam 1″ from the bottom of the frame.

Then I measured the distance between them to find the height of my solar panel stand.

My stand height checked in at 22.25″.

Decide how tall to make your stand. Record this number.
My Stand Dimensions
Here are the stand dimensions I ended up with for my solar panel:
- Crossbar length: 35″
- Stand width: 21″
- Stand height: 22.25″
Your dimensions will almost certainly be different if your panel is a different size, from a different brand, or mounted vertically instead of horizontally.
Step 4: Calculate the PVC Dimensions
Now that we know our stand dimensions, we need to calculate the length of the following pieces of PVC:
- Base and support beams
- Upper and lower leg sections
Before we can do that, we need to measure the diameter of our PVC joints.

My joints were all 1.25″ in diameter.
Measure yours and record this number.
Base & Support Beams
To find the length of the beams, we need to subtract the added length of the PVC joints from the width of the stand.
Beam length = Stand width – Length of PVC joints
My stand width is 21″. I decided this in Step 3.
I also know that my PVC joints are 1.25″ in diameter. Because each beam has two PVC joints attached to it, I double this number to get the added length of both of them.
1.25″ * 2 = 2.5″
Now I can figure out my beam length.
Beam length = 21″ – 2.5″
Beam length = 18.5″
So my base and support beams should both be 18.5″ long if I want my stand to be 21″ wide.
Calculate the length of your beams in the same manner. Record this number.
Upper & Lower Leg Sections
To find the combined length of the leg sections, we need to subtract the added length of the PVC joints from the height of the stand.
Combined length of leg sections = Stand height – Length of PVC joints
My stand height is 22.25″. I decided this in Step 3.
Because each leg has three PVC joints attached to it, I tripled the diameter of the joints (1.25″) to find the added length of all three of them.
1.25″ * 3 = 3.75″
Now I can figure out the combined length of my leg sections.
Combined length of leg sections = 22.25″ – 3.75″
Combined length of leg sections = 18.5″
So the combined length of my upper and lower leg sections should be 18.5″ if I want my stand to be 22.25″ tall.
I plan to make the upper and lower sections the same length. So to get the length of a single section, I just halve 18.5″.
18.5″ / 2 = 9.25″
Now I know all my PVC dimensions!
My PVC Dimensions
- Crossbar length: 35″ of 1/2″ PVC (from Step 3)
- Base beam: 18.5″ of 3/4″ PVC
- Support beam: 18.5″ of 3/4″ PVC
- Upper leg sections: 9.25″ of 3/4″ PVC
- Lower leg sections: 9.25″ of 3/4″ PVC
Once again, your dimensions will very likely be different from mine!
Step 5: Cut the PVC
Time to make some cuts. (Finally!)
Using a saw and tape measure, I started cutting my PVC to my calculated dimensions.
First I cut a 35″ section of the 1/2″ PVC for the crossbar.
Tip: Cut your PVC somewhere where it’s easy to sweep up all the shavings.

Then I cut two 18.5″ sections of the 3/4″ PVC for the base and support beams.

Lastly, I cut four 9.25″ sections of the 3/4″ PVC for the upper and lower leg sections.

Before assembling everything, I used a 3/8″ drill bit to drill a hole in the middle of the base beam large enough to fit my tent stake and paracord. (You’ll see why this is helpful in a bit.)

Time for the moment of truth!
Connect all your pieces of PVC together as shown and put the stand on the back of your solar panel to make sure it all fits.

Check! 🥳
Note: If my stand looks a little short, it’s because when making it I accidentally used the wrong stand height in my calculations. I used 21″ instead of 22.25″. Whoops! 😅
Step 6: Attach the Stand to Your Solar Panel
Now we’re in the home stretch.
It’s time to attach the stand to the panel.
Slide two of the tee joints on the crossbar, if they aren’t on there already.
Screw the crossbar to the solar panel frame. I used a Phillips head drill bit and one self-drilling screw on each end of the crossbar.
Tip: Place a towel underneath your panel to protect the solar cells from being pressed against the ground when drilling.

Now, if you haven’t already, connect your stand together.

And just like that…
…you’re DONE!!
Try out your snazzy new homemade solar panel stand by standing up your panel.

Admire its beauty 🤩. And pat yourself on the back. You did good.
Step 7: Test Your DIY Solar Panel Stand
Use our solar panel angle calculator to calculate the best tilt angle for your location, or browse our list of the best solar angles by zip code.
Then use our solar panel azimuth calculator to find the best direction to face your panel.
Go outside, face your panel towards the azimuth, and mount it at your optimal tilt angle.

Your panel likely won’t stay mounted at this angle by itself. You’ll need to hold it in place somehow.
You can do this one of two ways:
- Tent stakes
- Paracord
Tent Stakes
Tent stakes are best when you’re mounting your solar panel on the ground or somewhere else you can drive a stake into.
If you’re using tent stakes, stake one through the hole you drilled in the base beam.

One stake may be all you need. However, at low angles, the panel itself may slide forward.
You can prevent this by placing a second stake in front of the panel.

Done!

Paracord
Paracord is best when you’re racking your solar panel somewhere you can’t stick a stake — such as a roof or apartment balcony (or, in my case, an astroturfed patio).
Look for any pre-drilled holes in your panel’s frame that you can feed paracord through. You may have to drill a hole yourself if yours doesn’t have any.
Mine had two, fortunately on the correct side.
Feed one end of your paracord through the hole(s).

Feed the other end through the hole in the base beam and tie your knot of choice. I went with two half hitches since it’s easy to adjust.

Stand your panel up and adjust the knot as needed until you reach your desired tilt angle.

Finished!

You’re Done!
You’ve made your very own DIY adjustable solar panel stand.
Now that your solar panel is mounted at the optimal tilt angle, it will collect even more solar energy for your solar power system.

Not bad for $11!
3 DIY Solar Power Projects You Can Build Now
Not sure what to do with all that extra solar energy?
Here are some ideas for your next project:
1. DIY Solar Power LED Strip Lights

LED lights are incredibly energy efficient. A 100 watt panel could power most 18 watt strips for hours each day.
2. Connect Your Solar Panel to a 12 Volt Battery
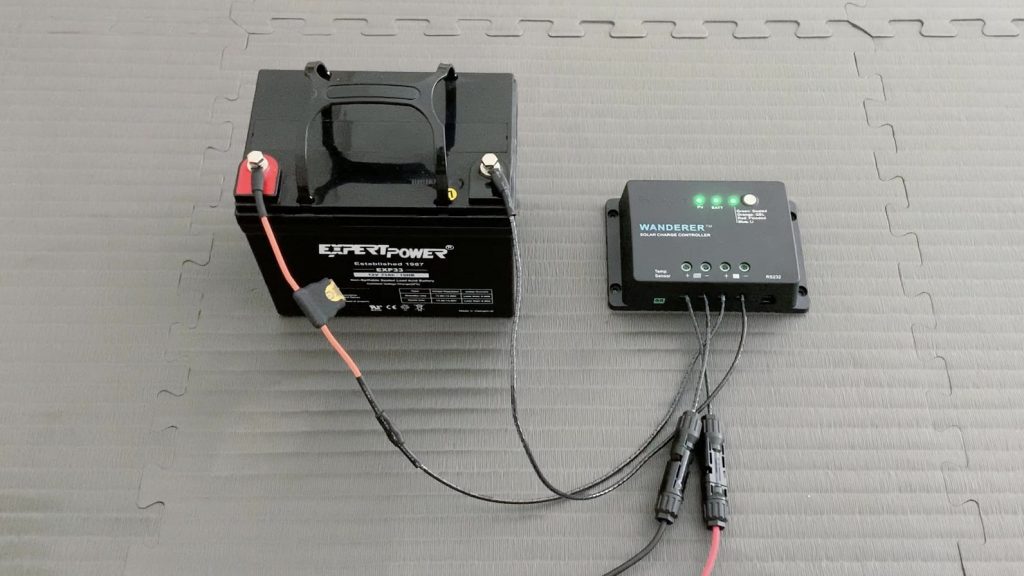
Charge a 12 volt battery by connecting it to your solar panel. It’ll charge even faster now that your panel is mounted at the optimal tilt angle.
3. DIY Solar Panel Wall Mount

Got any other solar panels that need mounting? Sometimes the best place to put a panel is on the wall. Here’s a simple solar wall mount that’s great for small panels.
H/T to Guns and Gear Network whose video gave me the idea for this PVC solar panel stand.


