This tutorial contains step-by-step instructions on wiring solar panels in series and parallel.
You’ll learn:
- How to wire solar panels in series
- How to wire solar panels in parallel
- The differences between series vs parallel wiring
- When to use each
Let’s get started.
How to Wire Solar Panels in Series

Video Tutorial
Here’s a short video I made showing how to wire solar panels in series. Check it out and consider subscribing to my YouTube channel if you like DIY solar videos like this!
Parts

- 2 identical solar panels
Tools

- Multimeter (optional)
Solar Panel Series Wiring Diagram

Notes
- It is recommended that you use identical solar panels
- If the solar panels are not identical, they should have the same current rating
Step 1: Identify the Positive and Negative Cables on the Solar Panels
There are two ways to identify the positive and negative cables on your solar panels.
The easiest way is to look at the cables themselves and see if they’re already marked. For instance, my solar panels both had plus and minus tags attached to the positive and negative cables.

If yours don’t, there may also be small plus and minus signs on the MC4 connectors or the junction box.

If your panels give no indication which cables are which, use a multimeter to measure each panel’s open circuit voltage (Voc). If the voltage is positive, the positive multimeter probe is touching the positive cable. If the voltage is negative, the positive probe is touching the negative cable.
Tip: If you’re worried about forgetting which cables are which, mark the positive cable on each panel with some tape.
Step 2: Place the Solar Panels Face Down
Place them face down on the ground, on top of a blanket or towel to protect the panel glass.

This does two things:
- Gives us easy access to the cables
- Stops the solar panels from generating power while we’re working with them
Step 3: Connect the Positive Cable of the First Solar Panel to the Negative Cable of the Second
This step takes all of 10 seconds. Here’s a video showing you how to do it:
That’s it!
Your two solar panels are now wired in series.
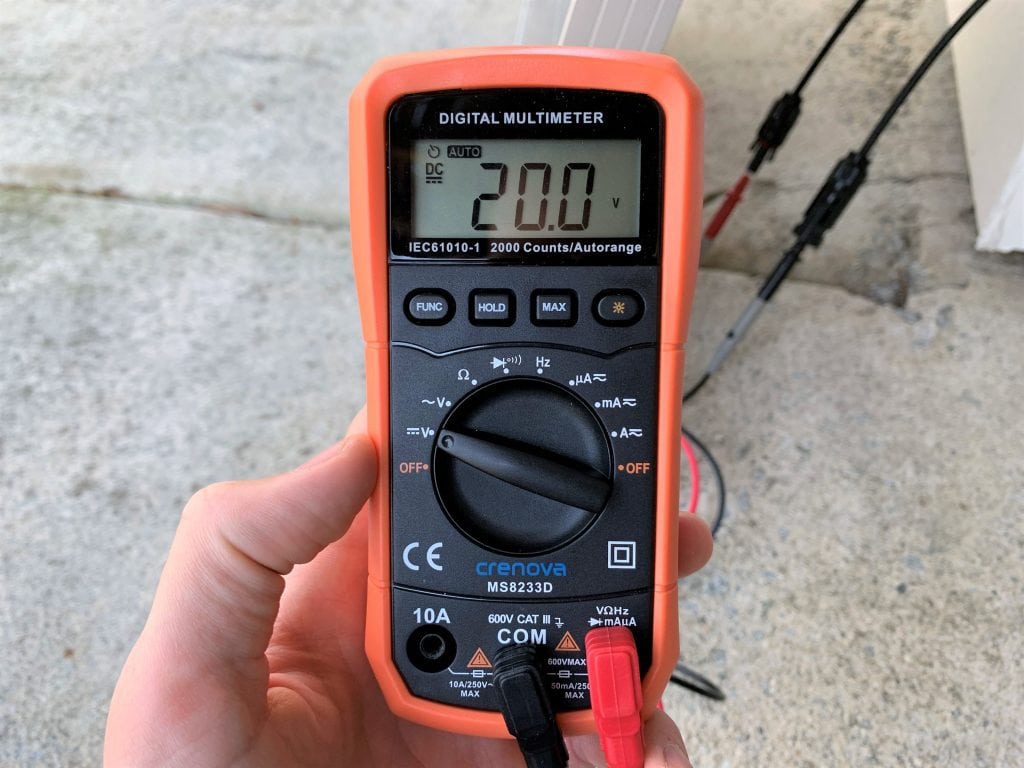
If you want, you can confirm they’re correctly wired in series by taking the panels outside and using a multimeter to measure the string’s open circuit voltage. It should be close to the sum of the 2 panels’ open circuit voltages.
For instance, each of my panels has an open circuit voltage of 22.6 V. The sum of these is 45.2 V (22.6 + 22.6). So I expect the open circuit voltage of the 2-panel string to be close to this.
Indeed, when I took it outside and measured its open circuit voltage, I got a reading of 38.7 V (a little low because the panels were in full shade for photo-taking reasons). That’s in the ballpark of 45.2 V, so I know my 2 panels are properly connected in series.

Want to wire 3 or more solar panels in series?
Easy. Just connect the positive cable of the third solar panel to the negative cable of your 2-panel string. You can string together as many panels as you want like this.
Step 4: Connect the Solar Panels to the Solar Charge Controller
Connect the charge controller to the battery, if you haven’t already.
Then connect the solar panels to the charge controller like normal.
Note: Before you do, make sure your charge controller’s max PV voltage is greater than the max open circuit voltage of your solar panel string.
Place the solar panels outside in direct sunlight and they’ll start generating solar energy.

If your charge controller displays system specs, you can locate the PV voltage and confirm that it’s as expected. Because the panels are now connected to the charge controller, you aren’t looking at the open circuit voltage anymore, rather the max power voltage (Vmp or Vmpp).
For example, the max power voltage for each of my panels is 18.5 V. Because they’re connected in series, the max power voltage of the string will be the sum of both of their voltages: 37 V (18.5 + 18.5). My charge controller told me the PV voltage was 34.7 V, which is close to 37 V. So the panels are working as expected.

Done!
How to Wire Solar Panels in Parallel

Parts

- 2 identical solar panels
- 1 pair of Y branch connectors
- MC4 inline fuses (if necessary)
Tools
- Multimeter (optional)
Solar Panel Parallel Wiring Diagram

Notes
- You may have to connect MC4 inline fuses between the positive solar panel cables and branch connector. Here’s a good video showing you when you need to fuse your solar array.
- It is recommended that you use identical solar panels
- If the solar panels are not identical, they should have the same voltage rating
Step 1: Identify the Positive and Negative Cables on the Solar Panels
Once again, the easiest way to do this is to looks for plus and minus signs on the cables, MC4 connectors, or junction box. If that doesn’t work, use a multimeter as described above.
Step 2: Place the Solar Panels Face Down
Place them face down on the ground, on top of a blanket or towel to protect the panel glass.

Step 3: Connect the Cables to the Y Branch Connectors
These are Y branch connectors:

They’re used for wiring 2 solar panels in parallel. You’ll need to get a pair to complete these steps.
Connect the 2 positive solar panel cables to the compatible Y connector. This will likely be the FFM connector. (FFM stands for “female, female, male,” meaning the Y connector with 2 female MC4 connectors and 1 male MC4 connector.)
Then connect the 2 negative solar panel cables to the other Y connector. This will likely be the MMF connector.
Note: If using MC4 inline fuses, connect them between the each positive cable and the Y connector.
Done! The 2 solar panels are now wired in parallel.
Need to wire more than 2 solar panels in parallel? Simple — just get the right size branch connector.
For example, if wiring 3 solar panels in parallel, use a pair of 3 to 1 branch connectors.

And if wiring 4 solar panels in parallel, use 4 to 1 branch connectors.

Note: When wiring solar panels in series, I showed you how to confirm that they were correctly wired by checking the open circuit voltage of the 2-panel string with a multimeter. Technically, you could check that your panels are properly connected in parallel by measuring the string’s short circuit current (Isc). BUT, many multimeters have a 10 amp current limit, and, in many cases, two solar panels wired in parallel have a combined short circuit current that is greater than 10 amps.
Step 4: Connect the Solar Panels to the Solar Charge Controller
Connect the charge controller to the battery, if you haven’t already.
Connect the solar panels to the charge controller like normal.
Note: Before you do so, make sure that the maximum expected charging current from your controller to your battery doesn’t exceed the current ratings of your wiring, fuses, and charge controller. Also, make sure this number doesn’t exceed your battery’s recommended maximum charge current.

If you want to make sure everything’s wired and working properly:
Wait until the panels are in direct sunlight, then locate the PV current on your charge controller (if it displays it) and confirm that it’s as expected. Because the panels are connected to the charge controller, we’re now looking at max power current (Imp or Impp) instead of short circuit current.
For example, the max power current on each of my panels is 5.41 A. Because they’re connected in parallel, the max power current of the array will be the sum of both of their currents: 10.82 A (5.41 + 5.41). During a moment of full sun, my charge controller told me the PV current was 8.51 A. Solar panels typically output around 70-80% of their rated output, and 8.51 A is roughly 80% of 10.82 A. So the panels are generating the expected amount of power.

Done!
Wiring Solar Panels in Series vs Parallel: What’s the Difference?
Wiring solar panels in series sums the voltages, but the current remains the same.

Wiring solar panels in parallel sums the currents, but the voltage remains the same.

Note: You can calculate the power output of your series and parallel wiring configurations with our solar panel series and parallel calculator.
Example
For example, let’s say you have two 12 volt 100 watt solar panels that each output 8 amps. If wired in series, the 2-panel string would have a voltage of 24 volts and a current of 8 amps. If wired in parallel, the 2-panel string would have a voltage of 12 volts and a current of 16 amps.
Regardless of whether you wire the 100 watt panels in series or parallel, the 2-panel string will produce a max output of 200 watts.
When Should I Wire Solar Panels in Series and Parallel?
Series
Pros
- No extra parts or equipment required
- Keeps current (amperage) low — you can use smaller gauge wire and save money
- Series strings work better at the beginning and end of the day
Cons
- Doesn’t work well in shade — when a single panel in a series configuration gets shaded, the power output of the entire array drops
When to Use
- Your solar panels will spend most of their time unshaded
- You want to save on wire and equipment costs — equipment with lower currents ratings is less expensive
- You’re using an MPPT charge controller — PWM charge controllers are much less efficient than MPPTs when the voltage of the solar array is much higher than the voltage of the battery bank
Most of the time, I prefer wiring solar panels in series. It’s easy to do, doesn’t require extra equipment, and saves you money on wiring costs. The main thing you have to take into account is the max PV voltage of your charge controller. Make sure the expected max voltage of the series string doesn’t exceed this number.
Parallel
Pros
- Works well in shade — when a panel in a parallel configuration gets shaded, the remaining panels will continue to output power as expected
Cons
- Requires branch connectors
- May need to fuse the solar panels
- Increases current — you need to buy thicker, more expensive wire, and equipment with higher current ratings
- Doesn’t work as well at the beginning or end of the day
When to Use

- Your solar panels spend most of the time in the mixed-light conditions
- You’re using a cheaper PWM charge controller — PWM controllers reduce the PV voltage to match the battery voltage, so are best used when these two voltages are similar
Wiring panels in parallel requires a bit more care. When I do it, I calculate the expected max charging current I expect my charge controller to output and make sure all my wiring and equipment are rated for that level of current. I also make sure I’m not exceeding the recommended max charge current of my battery. Doing so can reduce its lifespan.
Nowadays, I only really use parallel connections is when I’m connecting a couple 100 watt or smaller solar panels to a PWM charge controller such as the Renogy Wanderer 30A. With that size solar array, the max amperage is still relatively small, so I probably won’t have to buy any new equipment for the increased current.
The Bottom Line
It’s easy to wire solar panels in series and parallel configurations. The harder part is knowing when to use each.
Series wiring is my preferred method because it saves me money on wire, and I don’t have to buy any extra equipment. If you’re using an MPPT charge controller, it’s the method I recommend.
Parallel wiring can be more costly because you have to buy branch connectors, at minimum. In some cases, you’ll also need to buy MC4 inline fuses, thicker wire, and equipment with higher current ratings. I pretty much only use it when I’m using 100 watt or smaller solar panels with a PWM charge controller. I’ve found in those situations I rarely need to upgrade my equipment.
For larger solar arrays, the best option is usually to blend series and parallel wiring into a series-parallel configuration.


