In this guide I’ll show you how to connect a solar panel to a charge controller in JUST 3 steps.
To help you out, I’ve made a wiring diagram and step-by-step videos. Follow along and your charge controller will be wired and set up properly in no time.
Here we go:
Materials & Tools

Materials
Note: I’ve sized the materials for my energy needs. You can copy them as-is or adjust as necessary.
- HQST 100W 12V solar panel
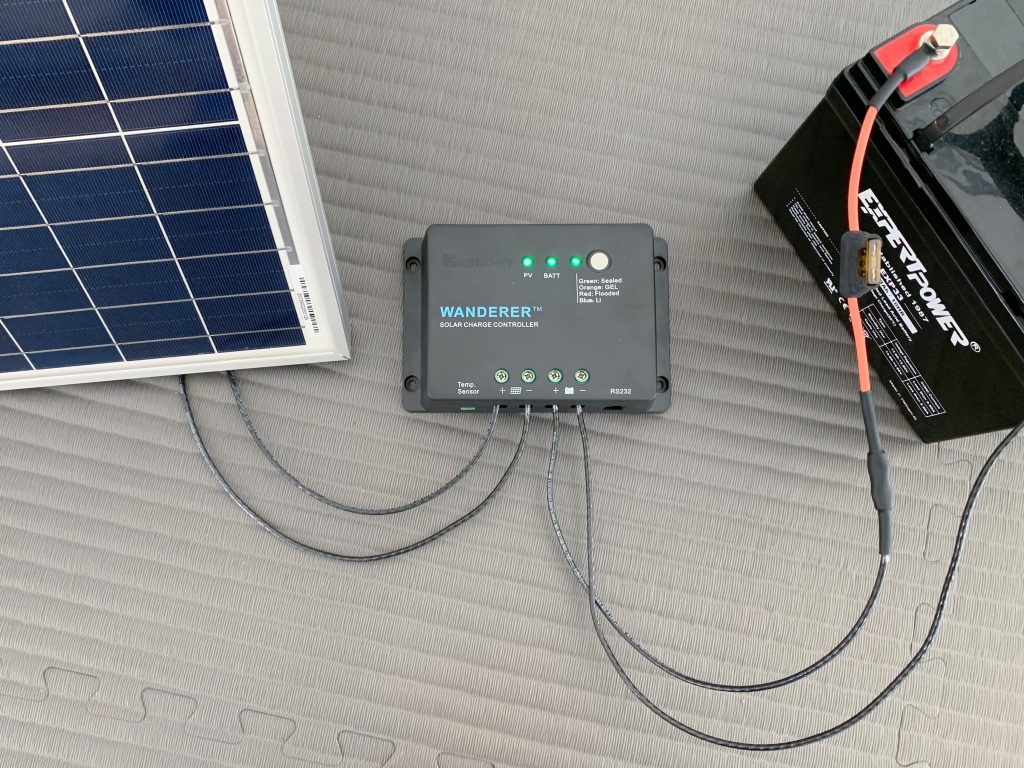
- Renogy Wanderer 30A solar charge controller
- ExpertPower 12V 33Ah lead acid battery
- Renogy battery to charge controller tray cables
- Littelfuse inline fuse holder w/ properly rated fuse (or ANL fuse set w/ Renogy fuse cables)
- Renogy solar panel to charge controller adapter cables
- MC4 inline fuse
Tools
- Screwdriver
Step 1: Connect the Battery to the Charge Controller
Note: These installation instructions should not supersede those in your charge controller’s or battery’s manual. Where these instructions differ from your manual’s, follow your manual!
Check out the wiring diagram to see how to connect a solar panel to a charge controller:

Here’s the important thing to know:
Connect the battery to the charge controller FIRST. Then you connect the solar panel SECOND.
If you do it in the wrong order, you can damage the charge controller. And that just wouldn’t be any fun.
Ok! Let’s connect this battery.
Connect the negative battery cable to the “-” battery terminal on the charge controller. Connect the positive battery cable to the “+” battery terminal.
Now connect the battery cables to the battery terminals. Connect negative first, then positive.
Your charge controller should turn on or light up. For instance, mine has a light labeled “BATT” that turns on when the battery is properly connected.
Your battery is now connected!
Step 2: Connect the MC4 Solar Adapter Cables to the Solar Panel
This step takes all of 20 seconds to do.
Locate the MC4 connectors at the ends of your solar panel’s cables. There’ll be a male and a female one. They’ll look like this:

Connect the MC4 inline fuse and positive solar adapter cable to the positive solar panel cable. Connect the negative solar adapter cable to the negative solar cable. Don’t let the exposed wires touch! ⚡
Didn’t I say it’d take all of 20 seconds?
On to the final step!
Step 3: Connect the Solar Panel to the Charge Controller
Your battery is connected. ✅
Your solar panel wires are ready to go. ✅
Now it’s time to do what you came here to do — connect solar panel to charge controller!
Connect the negative solar cable to the “-” solar terminal on the charge controller. Connect the positive solar cable to the “+” solar terminal.
Note: On some charge controllers, the solar terminals are labeled “PV.” This stands for “photovoltaic,” which refers to the method of producing energy using solar panels.
Like before with the battery, the charge controller should light up or somehow indicate that the solar panel is properly connected.
At this point, consult your charge controller’s manual to see if you need to program it at all. You may have to indicate your battery type, voltage, or other details.
Fortunately for me, my controller’s default settings matched my system’s specs, so I didn’t have to change anything.
And that’s it!
Now you know how to connect a solar panel to a charge controller! 🥳
Whenever you want to disconnect your solar panel, be sure to do everything in reverse order: disconnect the panel first, THEN disconnect the battery.
Put your solar panel in the sun, and let it charge your battery with free solar energy. Relax and daydream about your next DIY solar power project.
Tip: If you want some ideas on how to add on to this setup, check out my tutorial on making your first solar panel system.
Solar Panel to Charge Controller Wiring FAQ
1. Why do I need solar adapter cables?
Your solar panel’s cables likely come with pre-attached MC4 connectors. MC4 connectors are great for connecting two solar PV wires together…
…but they can’t connect to a charge controller. So we need solar adapter cables.
Solar adapter cables have an MC4 connector on one end and are stripped at the other. That way, you can connect the MC4 connector to the solar panel cable and then connect the stripped end to the charge controller.
2. What if my solar panel doesn’t have MC4 connectors?
Buy some solar adapter cables with the connectors that match the ones on your solar panel wires.
If you can’t find any, you might have to make your own by cutting two lengths of solar PV wire, stripping both ends, and crimping on matching connectors.
3. Why isn’t my charge controller lighting up/turning on when I connect my solar panel?
Your panel probably just needs some sun!
Put it outside in direct sunlight. Your charge controller should light up or somehow indicate that the panel is properly connected and the battery is charging.
If that doesn’t work, check your charge controller’s manual for troubleshooting.


