This tutorial contains everything you need to know about how to test solar panels.
You’ll learn:
- How to test a solar panel with a multimeter
- How to check a solar panel’s current with a clamp meter
- How to measure a solar panel’s power output with a DC power meter
Let’s get started!
Video Tutorial
Table of Contents
1. How to Test a Solar Panel with a Multimeter

Your multimeter is your best friend when testing solar panels.
You can use it to check:
- Open circuit voltage (Voc)
- Short circuit current (Isc)
- Current at max power (Imp)
Here’s how:
What You Need
- Multimeter — I recommend getting one that is auto-ranging. Also, a simple voltmeter won’t work here. You need a multimeter that can measure both volts and amps.
Step 1: Measure Open Circuit Voltage (Voc)
1. Locate the open circuit voltage (Voc) on the specs label on the back of your solar panel. Remember this number for later.
For this method I’m using the Newpowa 100W 12V panel. It has a Voc of 19.83V.

2. Prep your multimeter to measure DC volts. To do so, plug the black probe into the COM terminal on your multimeter. Plug the red probe into the voltage terminal. Then set your multimeter to the DC voltage setting (and the correct voltage range if yours isn’t auto-ranging). It is indicated by a solid line above a dotted line next to the letter V.

3. Take your solar panel outside and place it in direct sunlight. For best results, angle it toward the sun. When you do this the sky should be completely clear and the panel should be clean. Most importantly, double check that no part of the panel is in shade.

4. Locate the positive and negative solar panel cables. The positive cable is typically the one with the male MC4 connector, which has a red band around it.

5. Touch the red probe of your multimeter to the metal pin inside the positive MC4 connector and touch the black probe to the metal pin inside the negative MC4 connector.

6. Read the voltage on your multimeter and compare it to the open circuit voltage (Voc) listed on the back of your panel. If your voltage reading is negative, reverse the probes and measure again.
I measured a Voc of 19.85V on my panel. The claimed Voc for this panel is 19.83V, so we’re spot on.

The voltage you measure with your multimeter should be close to the open circuit voltage listed on the back of the panel. It doesn’t have to be identical, though.
If they’re similar, so far your panel seems to be in good condition. You can move on to the next step — measuring short circuit current.
If your voltage measurement is far off the listed Voc, it doesn’t necessarily mean your panel is damaged or defective. There are some basic troubleshooting steps at the end of this article that may solve the issue.
Step 2: Measure Short Circuit Current (Isc)
1. Locate the short circuit current (Isc) on the specs label on the back of the panel. Remember this number for later.
My panel’s Isc is 6.56A.

2. Prep your multimeter to measure DC amps. To do so, move the red probe to the amperage terminal. Set your multimeter to the amp setting (A), choosing the right limit if yours isn’t auto-ranging.
Warning: Make sure your multimeter’s current rating is greater than your panel’s short circuit current. The current rating is usually listed above the amperage terminal. For example, my multimeter has a current rating of 10A and my panel’s Isc is 6.56A, so I’m okay. If your panel’s Isc is greater, you’ll have to measure the current with a clamp meter.

3. Take your panel outside and put it in direct sunlight. I recommend throwing a towel over it to stop it from generating most of its power.
4. Touch the red probe of your multimeter to the metal pin inside the positive MC4 connector. Touch the black probe to the metal pin inside the negative MC4 connector.
Warning: There may be a small spark when you complete the connection. This is normal. That’s why I like using the towel to limit the panel’s output.
5. Remove the towel and read the current on your multimeter. Adjust the tilt angle of your solar panel until you find the max current reading and compare this number to the short circuit current (Isc) listed on the back of your panel.
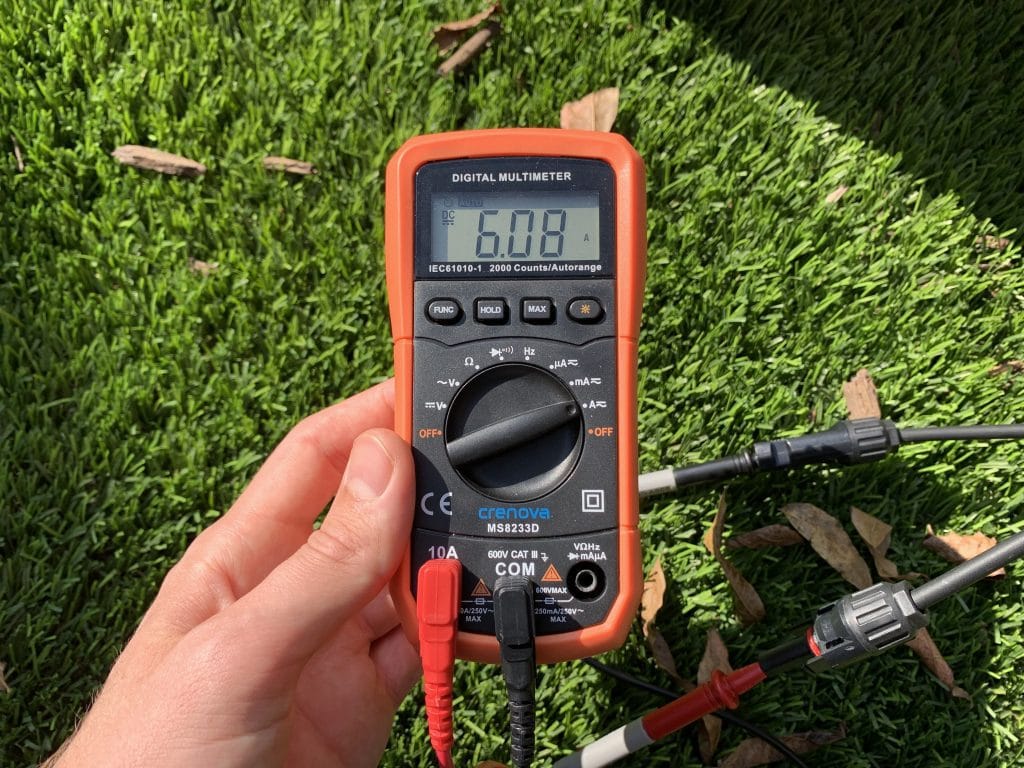
The short circuit current you’re measuring should be close to the one listed on the back of the panel. It doesn’t have to be the same, though.
For instance, I only measured 6.08A but my panel’s claimed Isc is 6.56A. There was a little haze in the sky when I tested, though, plus it was 11AM on a November morning, so I’m fine with these results. On a clear spring day at noon I’d expect it to be nearly identical to the Isc.
If your voltage and current measurements are similar to the Voc and Isc listed on the back of the panel, great! Your panel is working fine.
For most people, measuring open circuit voltage and short circuit current are all you need to do to test that your solar panel is in good working order. You can stop testing if you want.
However, if you want to keep at it, there are more ways to test a solar panel with and without a multimeter. Keep reading to find out how.
Step 3: Measure Operating Current (aka PV Current)
Note: You can more easily measure PV current by using a clamp meter, which I discuss below in method #2.
That’s right — you can use a multimeter to measure how much current your solar panel is outputting. However, to do so your solar panel needs to be connected to your solar system.
Here’s how:
1. Locate the maximum operating current (Imp) on the back of the panel. My panel’s Imp is 6.26A. Remember this number for later.
Warning: Once again, make sure your panel’s Imp doesn’t exceed your multimeter’s current rating, otherwise you risk blowing the multimeter’s fuse.
2. Disconnect the positive solar cable from the positive charge controller cable.

3. Prep the multimeter to measure DC amps.
4. Throw a towel over the solar panel to stop it from generating any power.
5. Touch the red multimeter probe to the metal pin on the male MC4 connector (the one connected to the solar panel), and touch the black multimeter probe to the metal pin on the female MC4 connector (the one connected to the charge controller). Doing so will complete the connection between solar panel and charge controller.

6. Remove the towel from your solar panel and read the amperage on your multimeter. Once again, adjust the panel’s angle until you get the max current reading. My panel output a max of 4.46A.

Pretty cool!
4.46A is around 71% of 6.26A. While this may seem far off, it’s actually not that bad. Solar panels typically produce 70-80% of their rated power output, only reaching close to 100% in the industry-standard set of test conditions.
Also, keep in mind that I tested this panel in November while there was a little haze in the sky. So even though it seems low it’s still in line with expectations.
2. How to Test Solar Panel Amps with a Clamp Meter

A clamp meter, sometimes called an ammeter, can measure the level of current flowing through a wire. You can use one to check whether or not your solar panels are outputting their expected number of amps.
A clamp meter makes solar panel testing incredibly quick and convenient because you don’t have to disconnect your panels in order to check them.
What You Need
- Clamp meter — Get one that can measure AC and DC current; many can only measure AC current.
- A working solar panel system — This testing method assumes your solar panel is already connected to your system and producing power. (If yours isn’t, first set it up.)
Step 1: Prep Your Clamp Meter to Measure DC Amps
1. Turn the clamp meter’s dial to the correct amps setting. For most people, that will be the lowest amperage setting. For instance, the solar panel I’m testing this time around — the Renogy 100W 12V solar panel — outputs only around 5-6 amps at max power, so I turned mine to the 60A setting.

2. Some clamp meters default to measuring AC current, so switch to the DC current mode if needed. You also might need to zero out the reading before measuring DC current.

Now your clamp meter is good to go.
Step 2: Measure the Solar Panel’s Current
Open the jaws of the clamp meter, place one of the solar panel’s wires inside, and close the jaws. The solar panel’s current reading will show on the display. Remember this number. I got 5.24 amps when I checked mine.

Sometimes, depending on which way the meter is oriented, you may get a negative current reading. That’s completely normal, just clamp the other wire or point the meter in the opposite direction and then re-clamp the wire.

Tip: When checking solar panel current with a clamp meter, never clamp more than one wire at a time. If you do, because the current is flowing in opposite directions, it will cancel itself out and you’ll get a reading of zero amps.

Step 3: Compare Your Current Reading to the Panel’s Max Power Current
1. Look at the label on the back of your solar panel. Find the panel’s current at max power, abbreviated Imp. It may also be called the maximum operating current or something similar. In this example, my panel’s listed Imp is 4.91 amps.

2. Compare the panel’s Imp to your current reading. Your current reading should be in the ballpark of the panel’s current at max power, but by no means does it have to be identical. The current I measured was 5.24 amps and my panel’s Imp is 4.91 amps, so I know my panel is working properly!
Remember that if your panel’s output is far less than expected, I talk about reasons why that might be at the end of this article.
3. How to Measure Solar Panel Output with a DC Power Meter
This is a DC power meter (aka watt meter):

You can find them for cheap on Amazon. Connect one inline between your solar panel and charge controller and it’ll measure voltage, current, wattage, and more.
Here’s how to use one.
What You Need
- DC power meter without MC4 connectors and an MC4 crimper kit to crimp connectors on, or a DC power meter with MC4 connectors
- A working solar panel system
Steps
1. Crimp the MC4 connectors on, if needed. You can check out my tutorial on how to do this. In this case, I crimped them on one end and left the other end bare to connect directly to my charge controller.
Tip: You can buy this watt meter with MC4 connectors if you don’t want to fuss with crimping.

2. Connect the power meter inline between the solar panel and charge controller. Throw a towel of the panel during this step.

3. Remove the towel and place your solar panel outside in direct sunlight, if it isn’t already. Once you do, the watt meter will automatically turn on and start measuring your solar panel’s power output.
4. Check the wattage and compare it to the panel’s max power, or Pmax. This is the panel’s listed wattage and can be found on the back of the panel. At this point in the day, the clouds had rolled in, so my watt meter measured an output of 24.4 watts from my 100 watt solar panel.

As you can in the photo, you can also use a power meter to measure solar panel amps (1.86A) and voltage (13.14V). The meter also measures total watt hours, a useful metric for seeing how much energy your solar panel generates in a day.
However, the meter will automatically turn off once the solar panel stops producing power. When it turns back on, the totals will all be reset to zero. If you want to record your solar panel’s energy production over time, I recommend getting a charge controller with Bluetooth such as the Victron SmartSolar MPPT.
What to Do if Your Solar Panel Isn’t Outputting Power as Expected
If your solar panel isn’t outputting as much power as you expect, first do the following:
- Make sure the panel is in direct sunlight and is facing and angled toward the sun
- Check that no part of the panel is in shade
- Clean the solar panel if it’s dirty
- Make sure there are no clouds or haze blocking the sun. Even thin cloud coverage can reduce a panel’s output.
- Consider how old your solar panel is. A solar panel’s output declines slowly over time. If you have an older solar panel, age may be playing a role.
If you’ve done all that and the panel still doesn’t seem to be working, here are some basic troubleshooting steps:
- If the panel is extremely hot, cool it off by covering it or bringing it out of the sun for a little while. A panel’s voltage and wattage both decrease as its temperature increases. Be wary of spraying water on it to cool it down since cold water on hot glass can cause fractures.
- If your panel is connected to your system, check that your battery isn’t mostly charged. Charge controllers reduce a solar panel’s output once the battery is mostly charged. You can turn on a load to drain the battery a bit and see how that affects your panel’s output.
- If your panel is connected to other panels, make sure that the other panel’s aren’t limiting its power. Depending on how solar panels are wired together, their voltage or current output can be reduced. You can read more about this in the article underneath my solar panel series and parallel calculator.
If you do all that and your solar panel still isn’t working as expected, then it — or some of the equipment it’s connected to — may be damaged or defective. There could be damage such as hotspots, fractures, snail trails, or delamination.
Ultimately, it may be time to recycle the panel and get a new one.

